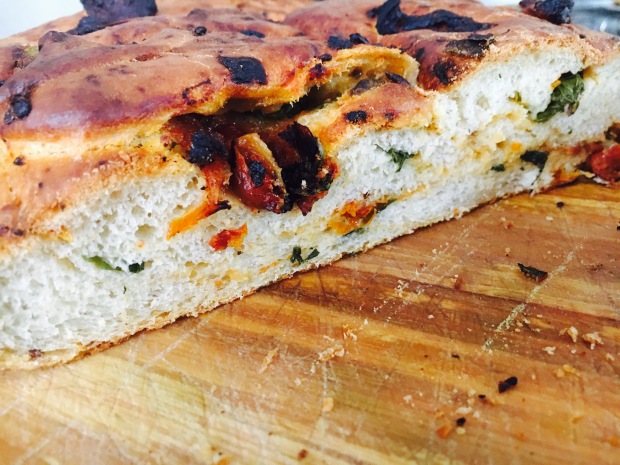
Sun-dried Tomato and Basil Bread
This bread was very popular when I served it at a cheese and wine party last month – I had to promise that we would make it at the next Bread Club meeting!
- 500g strong white flour
- 10g salt
- 10g fast acting yeast
- 60ml olive oil
- 300ml tepid water
- 100g sun-dried tomatoes in oil
- supermarket pack fresh basil
Put the flour, salt and yeast into a large bowl and mix. Add the oil and water and knead for 5 minutes or so until you have a smooth dough. Return to the bowl and leave to prove for an hour. Line a baking tray with non stick baking paper.
Roughly chop the sun-dried tomatoes. Remove the leaves from the basil and chop. When the dough has proved, lay it out on a smooth surface and incorporate the tomatoes and basil leaves as best you can. It will probably be quite oily and messy! Squash the dough into a long sausage and then tie it into a knot. Place on the prepared tray and leave to prove for another hour.
Preheat the oven to 230C/Gas 8. Bake the loaf for 30 minutes (don’t worry if there are some burned bits of tomato on the outside, they will taste really good) and transfer to a wire rack to cool.
Focaccia with Blue Cheese and Pear
This recipe is adapted from a recipe in the River Cottage Fruit book. I keep coming back to St Agur as the cheese of choice but you can experiment with your favourites.

- 500g strong white bread flour
- 10g salt
- 1 tsp fast acting yeast
- extra virgin olive oil (lots!)
- 150g blue cheese
- 1-2 pears
- Sea salt flakes
Mix the flour, salt and yeast in a large bowl. Add 3 tablespoons of extra virgin olive oil and 350ml lukewarm water and mix to combine. You might find this dough easiest to knead in a freestanding mixer with a dough hook, but it can be done by hand too – turn out onto an oiled surface and knead for 10 minutes. This is a very wet dough! You will need some sort of scraping device to get it off your hands from time to time – you might find oiling your hands helps. It will still be sloppy when it is done. Oil your bowl and put the dough back in, put it in a warm place and leave until it has doubled in size, which will take 1-2 hours.
Preheat the oven to 220C/Fan 200C/Gas 7. Liberally oil a large, shallow baking tin (a tray won’t do – you need sides). Tip the dough straight into the tin and spread it out with your hands to roughly fill the tin. Leave again for at least another 30 minutes, up to an hour, until it looks puffy.
In the meantime cut your cheese into chunks, you should get about 10 even sized pieces, and peel and chop your pears. I like slightly more chunks of pear than cheese here but you do what you like. Add more cheese if you want!
When the dough is ready press the cheese and pear chunks into it at evenly spaced intervals. I usually do the cheese first and then fit the pear in around it. Drizzle all over with olive oil and sprinkle with sea salt flakes. Bake in the preheated oven for 10 minutes, then turn the heat down to 190C/Fan 170C/Gas 5 and bake for another 15-20 minutes, until golden. Remove the focaccia from the tin and put it to cool on a wire rack. Eat while still warm for maximum enjoyment.
Hattie’s Princess Cake
Well, I did say we would be making Hattie another cake and here it is in all it’s pink and princessy glory! I am absolutely chuffed with it as it is the first ‘proper’ cake I’ve had a hand in. I have to take my hat off to Kate she knows her way around a cake and I have learned a lot from her today.
There is a lot of stuff I needed to buy before I even started – luckily there is a specialist cake decorating shop not far from where I live (especially lucky as I had to make two trips!) where I could pick it all up. Ready to roll icing, the princess decoration, ribbon and a cake board were on the shopping list. First off, of course, I had to make the sponge. We went with a basic Madeira Cake, quantities are for a 7 inch cake tin. I used two sandwich tins and shortened the cooking time which turned out fine but I have since learned that it is easier to shape one large cake and cut it in half where you want it so next time I will be doing that –
Madeira Cake
- 225g Unsalted Butter, softened
- 4 Medium Eggs
- 3 tbsp Milk
- 300g Self Raising Flour
- 2 tsp vanilla extract
Cream the butter and sugar together until light and fluffy. Lightly beat the eggs with the milk in a separate bowl. Gradually beat the eggs and milk into the creamed mixture, alternating with the flour.
Turn the mixture into a greased and lined tin. Level the surface and bake for 50-60 mins at 160C/Gas 3. Leave the cake in the tin for 10 mins then transfer it to a wire rack to cool.

Cakes - done in two 7 inch sandwich tins. Of course do it like this if you want, it took about 35 mins for them to cook (test them with a skewer).
Once the cakes were done it was time to move onto the filling. We made a (mmm unbelievably scrummy!) buttercream. This is to go inbetween the sponge and also around the outside as a fixer for the icing –
Buttercream
- 150g Unsalted Butter, softened
- 250g Icing Sugar, sifted
- 2 tsp hot water
Beat the butter with a little of the icing sugar until smooth. Gradually beat in the remaining sugar and the hot water until pale and creamy.

- Buttercream

Now it was time to put it all together. First we evened out the shape and size of the cakes, which was tricky.
Then we spread one with buttercream and the other with seedless raspberry jam and – hey presto – sandwiched them together!

Kate slicing the top off one of the sponges - with Dylan in the background. He was, as ever, very helpful!

The two halves.

Two become one.
Next we covered the whole cake in a thin layer of buttercream, ready for the icing. We used three packs of ready to roll icing, Kate kneaded them all together before rolling using a technique like you would for pastry, rotating the icing a quarter of a turn.

Kate rolling the icing next to the buttercream slathered cake.

On goes the icing!
Phew! Once the icing was on the hard bit was over. We smoothed it down with a smoother. I had to buy the smoother today as well as apparently Kate ruined her last one smoothing down a snowman last winter, but that’s another story…
I had loads of bits and bobs in the cupboard (marshmallows, white chocolate stars, silver balls and purple sprinkle topping were all overlooked) and eventually we decided on this pattern of jelly diamonds, which we stuck on with buttercream, to offset the princess. Isn’t she beautiful? I really enjoyed doing this and am going to do it all over again soon for Nelly’s birthday next week. Icing Owls perhaps?

Princess Hattie

I wonder if I'll get a taste...?
Soya and Linseed Loaf
I would highly recommend this loaf to those who are new to making their own bread but also those of you who just fancy trying a new technique. I came across this recipe in a great cook book called ‘Short & Sweet’ by Dan Lepard. It is, as Dan Lepard describes, a really sticky dough. Don’t let this put you off. There is very little kneading involved and so the stickiness of the dough does not cause any difficulties. In fact, once you see and taste the end result it helps to banish any fears you may have of handling a sticky or wet dough. With thanks to the soya milk this loaf will stay soft and moist for days and it has the added boost of omega-3 oil together with lots of extra protein and oat fibre. But apart from anything else, it really does taste great. I can honestly say, it is one of my favourite breads to date. Give it a go and tell us what YOU think…
- 50g rolled oats
- 50g golden linseed
- 100ml boiling water
- 275ml lukewarm soya milk
- 1 sachet of fast action yeast
- 325g strong white flour, plus extra for shaping
- 50g wholemeal or rye flour
- 1.5 teaspoons fine salt
- oil for kneading
Please put the rolled oats and linseed in a large mixing bowl, stir in the water and leave for 10 minutes to soften. Add the warm soya milk and yeast and mix well. Add the two flours and salt, then stir everything together into a big soft and sticky dough. Cover and leave for 10 minutes. Now rub a little oil over a 30cm area of work surface, and a little more over your hands, just to stop the dough from sticking. Any light and fairly neutral oil such as sunflower oil will do. Gently lift the dough out of the bowl and place on the work surface. At this point you can scrape down the inside of the bowl and lightly oil it to avoid the dough sticking to it later.

Everything combined to form sticky dough
Now for the kneading. Take the edge of the dough furthest away from you with one hand and fold it towards you, to meet the edge of the dough nearest to you. Then with the heel of the other hand, push down lightly onto and into the dough and very slightly push and stretch the dough away from you by about 5-10cm. Make your movements gentle, don’t pound or tear the dough. Give the dough a clockwise quarter-turn, and once again fold the dough towards you, then push it away gently; and repeat this ‘turn, fold and stretch’ no more than eight or ten times. (For those of you who come to our bread making meetings, you will recognise this as the technic i use). Then return the dough to the bowl and repeat this simple kneading after 10 and 20 minutes. Then leave covered for 45 minutes.

Dough patted into a rectangle
Line a tray with non stick baking paper. Using a little flour pat the dough into a rectangle. Roll it up tightly, then roll a little more, pressing just on the ends so the dough forms a fat ‘lemon shape’. Place this seam-side down on the tray, cover with a cloth and leave until risen in size by half. This seems a little vague, however I think it is good practice to not be so reliant on times when following instructions like this. The time it takes to rise by half depends on the temperature of the room. I left my dough for an hour. Heat the oven to 220/200 fan/gas 7, slash the top and bake for about 45 minutes. Cool on a wire rack.

Dough rolled tightly

Finished loaf - note the lovely soft, springy texture
Bread Club Meeting 18/11/11 – Malted Seed and Walnut Loaf
Well, yesterday’s Bread Club meeting was very special for two reasons. Firstly, it was the first meeting held at the lovely Jennie’s house, and secondly we were joined by two novice breadmakers – Jo W and Hannah.

Some full on baking action! Jo L, Heather, Jo W, Kate and Hannah

Kate giving Hannah and Jo some kneading tips!
This is the recipe we used:
Malted Seed and Walnut Loaf
- 500g strong wholemeal flour
- 7g sachet fast-action dried yeast
- 1 tsp salt
- 350ml warm water
- 100g mixed seeds (we used a mix of sunflower seeds, poppy seeds, linseeds, hemp seeds, pumpkin seeds and sesame seeds)
- 50g walnut pieces
- a little sunflower oil , for greasing
Mix the flour, yeast and salt together in a large bowl. Add most of the seeds. You can add the walnuts now too (as I did) or incorporate them as you knead the dough (as Kate did).
Pour in the warm water. Bring the dough together in the bowl and when you are ready tip it out onto your work surface and begin to knead. You may need to add a touch more water, I found the mix a little dry. Knead the dough for 10 mins or so, until it starts to spring back when pushed. It is quite a tight dough and when it’s ready to prove it will feel like you just can’t knead it any more! Don’t forget to incorporate your walnuts while you are doing this if you haven’t done so already.
Clean your bowl and lightly grease it with sunflower oil. Place your dough in the bowl and cover it tightly with clingfilm. Put the bowl in a warm place and leave to rise for about 1 hour, or until doubled in size. If it doesn’t look like it’s doubled in size after an hour, leave it a bit longer!
When it’s ready knock the dough back by giving it a very quick knead, literally for 10 seconds. You are trying to get the air bubbles out of the dough, that is all. Shape it into a round and then roll it in the remaining seeds. Lightly grease a baking tray with sunflower oil, place the seed covered dough on the tray, and leave to prove again. It will be about the same time as before, and again, you are looking for the dough to double in size. Don’t rush it. While it’s proving preheat your oven to 220C/fan 200C/gas 7.
When it’s ready place the tray in the hot oven, closing the door gently. After 15 mins reduce the heat to 190C/fan 170C/gas 5 and bake for another 30 mins. Don’t be tempted to open the oven at all during this time, just let the bread bake! When the cooking time is up, check your bread. It should come off the tray without too much encouragement and when you tap the bottom of the loaf you should hear a ‘hollow’ sound. If you don’t think it’s done enough, pop it back in the oven for 10 mins. When it’s done, transfer the loaf to a wire rack and allow to cool. And then enjoy your bread! It’s very nice with goat’s cheese.
A Note on the Seeds – Everyone at the meeting used a different mix of seeds. I used hemp for the first time, personally I found them a little crunchy. Kate didn’t put any poppy in the loaf, but covered the outside with them, it worked well. Jo W left out the walnuts altogether (thinking of the palate of her baby son!). Jennie accidentally put double the amount of seeds in, but happily the loaf still tasted good! The upshot is, do whatever works for you.

Kate's Loaf
This was a really good meeting and I’m very pleased to say that our two newbies came away from it with excellent loaves of bread and totally stoked. A ‘bread epiphany’ was a phrase that was used! We would love to hear comments on the recipe or if anyone else wants to try it and post some pictures/experiences that would be great – Happy Baking people!!
